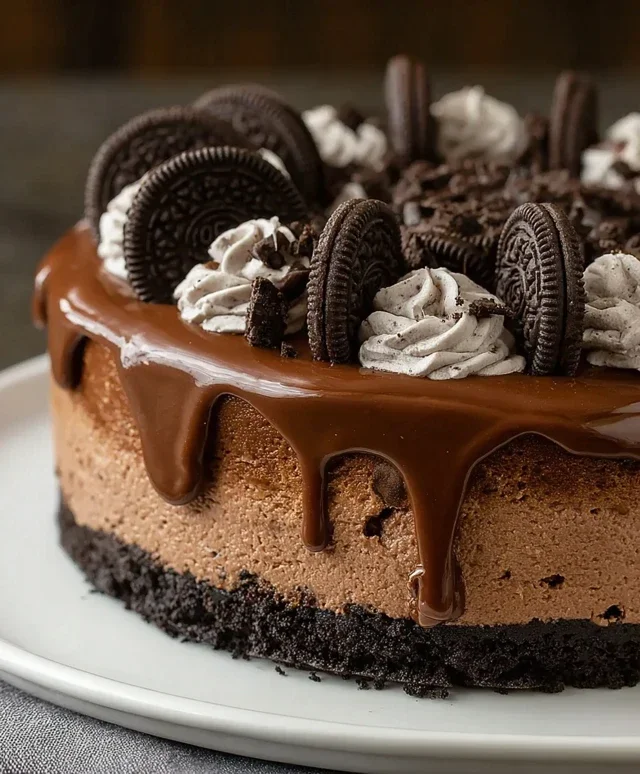
No Bake Oreo Nutella Cheesecake Easy Recipe
No Bake Oreo Nutella Cheesecake. If that combination of words doesn’t make your taste buds tingle with anticnon-alcoholic ipation, you might be in the wrong place! Prepare yourselves, because we’re about to dive headfirst into a dessert sensation that’s as ridiculously easy to make as it is utterly decadent. Why do we all love this specific confection? It’s the perfect storm of crunchy chocolate cookies, the intensely satisfying hazelnut-chocolate goodness of Nutella, and the impossibly creamy, dreamy texture of cheesecake, all without the fuss of an oven. This No Bake Oreo Nutella Cheesecake is truly special because it delivers all the indulgent flavor you crave with minimal effort, making it your new go-to for impressive, yet stress-free, sweet treats. Get ready to amaze yourself (and everyone lucky enough to get a slice) with this extraordinary creation!
No Bake Oreo Nutella Cheesecake
This No Bake Oreo Nutella Cheesecake is a dream come true for any dessert lover. Imagin extracte a rich, creamy cheesecake filling, infused with the irresistible hazelnut-chocolate goodness of Nutella, all nestled on a crisp Oreo cookie crust. And the best part? No oven required! This recipe is incredibly easy to make, making it perfect for a quick weeknight treat or a show-stopping dessert for your next gathering. The combination of crunchy Oreos and smooth Nutella creates a flavor and texture sensation that’s simply divine. Get ready to impress yourself and everyone you share this with!
Ingredients:
Crust Preparation
The foundation of any great cheesecake is a sturdy and delicious crust, and this one is no exception. We’ll be using the classic combination of crushed Oreos and melted butter for a wonderfully chocolatey base.
1. Start by crushing your Oreos. You can do this by placing them in a zip-top bag and using a rolling pin, or for a finer crum extractb, pulse them in a food processor until they resemble coarse sand. Make sure to get those cookies as fine as possible for a more cohesive crust.
2. In a medium bowl, combine the 200g of crushed Oreos with the 50g of melted butter. Stir thoroughly until all the cookie crum extractbs are moistened and the mixture resembles wet sand. This is crucial for ensuring the crust holds together well once pressed.
3. Take an 8 or 9-inch springform pan. This type of pan is ideal for cheesecakes as it allows for easy removal of the finished dessert. Pour the Oreo and butter mixture into the bottom of the pan. Use the back of a spoon or the bottom of a glass to press the crum extractbs down firmly and evenly across the base. Make sure to press it all the way to the edges to create a neat border. For an extra firm crust, you can place the pan in the refrigerator for about 15-30 minutes while you prepare the filling. This chilling step helps the butter solidify and bind the crum extractbs together.
Cheesecake Filling
Now for the star of the show – the incredibly smooth and decadent cheesecake filling! This is where the magic of Nutella truly shines.
4. In a large bowl, beat the 500g of softened cream cheese with an electric mixer until it’s completely smooth and creamy. Ensure your cream cheese is truly at room temperature; cold cream cheese will result in a lumpy filling, and we want absolute smoothness here. Gradually beat in the 200g of Nutella until it’s well combined and you have a luscious, uniform mixture. Scrape down the sides of the bowl as needed to ensure everything is incorporated.
5. In a separate, chilled bowl, whip the 200g of cold heavy whipping cream with the 50g of sugar until stiff peaks form. This means when you lift the whisk, the cream will stand up on its own without collapsing. Adding the sugar gradually while whipping helps it dissolve properly. Be careful not to over-whip, or you’ll end up with butter!
6. Gently fold about one-third of the whipped cream into the cream cheese and Nutella mixture. This step is called “lightening” the mixture and makes it easier to incorporate the rest of the whipped cream without deflating it. Once that’s incorporated, gently fold in the remaining whipped cream until just combined. Be careful not to overmix, as this can make the cheesecake dense. You want to maintain that airy, creamy texture.
Assembly and Swirl
It’s time to bring all these delicious components together! The swirl adds a beautiful visual appeal and extra pockets of Nutella flavor.
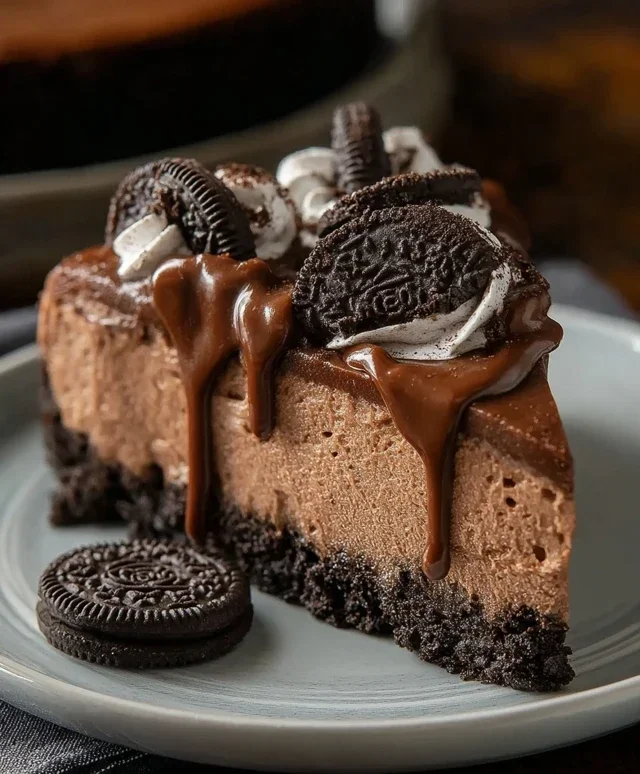
7. Add the 100g of chopped Oreos to the cheesecake batter. Gently fold them in until they are evenly distributed throughout. This adds a lovely textural contrast to the smooth filling.
8. Now, dollop spoonfuls of the remaining 100g of Nutella randomly over the surface of the cheesecake batter in the springform pan. Using a skewer or a knife, gently swirl the Nutella into the batter. Don’t over-swirl, as you want distinct ribbons of Nutella, not a uniform brown color. This creates those gorgeous marble effects.
9. Carefully spread the 5 crushed Oreos (no filling) evenly over the top of the cheesecake, on top of the Nutella swirls. This adds another layer of texture and flavor, giving you more of that delightful Oreo crunch.
Chilling and Finishing Touches
The most important step for a no-bake cheesecake is chilling! This allows the cheesecake to set properly and achieve that perfect, sliceable consistency.
10. Cover the springform pan tightly with plastic wrap. Refrigerate the cheesecake for at least 4-6 hours, or preferably overnight. This extended chilling time is essential for the cheesecake to firm up completely. The longer it chills, the firmer and more delicious it will be. Once the cheesecake is firm, carefully run a knife around the edge of the pan before releasing the springform side. This ensures a clean release.
11. Just before serving, gently warm the 100g of Nutella for drizzling by placing it in a microwave-safe bowl and heating it in 15-second intervals, stirring in between, until it’s pourable. Drizzle the warmed Nutella generously over the top of the cheesecake.
12. Finally, arrange the 6 whole Oreos decoratively on top of the drizzled Nutella for that perfect finishing touch. Slice and enjoy this incredibly decadent No Bake Oreo Nutella Cheesecake!
Conclusion:
There you have it – a truly divine No Bake Oreo Nutella Cheesecake that’s as effortless as it is decadent! This recipe truly shines because it delivers that rich, creamy cheesecake experience without the fuss of baking. The winning combination of crushed Oreos, smooth Nutella, and a velvety cream cheese filling creates a dessert that’s perfect for satisfying any sweet craving. Whether you’re a seasoned baker or just starting out, this no-bake marvel is guaranteed to impress. It’s ideal for potlucks, holidays, or simply a special treat after a long week. For serving, I love topping mine with extra whipped cream and a sprinkle of chocolate shavings, or a drizzle of more Nutella. Feeling adventurous? Try adding a layer of chopped hazelnuts between the Oreo crust and the filling for an extra nutty crunch, or even a swirl of melted white chocolate for a beautiful marbled effect. I really encourage you to give this No Bake Oreo Nutella Cheesecake a try – you won’t regret it!
Frequently Asked Questions:
Can I make this cheesecake ahead of time?
Absolutely! This cheesecake is perfect for making ahead. It needs at least 4-6 hours to chill and set properly in the refrigerator, but it’s even better when made the day before. This allows the flavors to meld together beautifully and ensures a firm, sliceable texture.
What if I don’t have Oreos?
No problem! While Oreos are fantastic for this recipe, you can substitute them with other chocolate sandwich cookies like Newman-O’s or even chocolate grabeef ham crackers for a slightly different, but still delicious, crust. Just adjust the amount of butter if using grabeef ham crackers, as they tend to be drier.
Is it possible to make this cheesecake vegan?
Yes, with a few substitutions! You can use vegan cream cheese, vegan butter for the crust, and a plant-based whipped topping. Ensure your Oreos are vegan-friendly as well. The texture might be slightly different, but the flavor will still be incredibly satisfying.
No Bake Oreo Nutella Cheesecake
A decadent no-bake cheesecake combining the classic flavors of Oreo and Nutella, perfect for any dessert occasion.
Ingredients
-
200g crushed Oreos
-
50g melted butter
-
500g cream cheese, softened
-
200g Nutella
-
200g heavy whipping cream (35%)
-
50g sugar
-
100g chopped Oreos
-
100g Nutella
-
100g Nutella, warmed for drizzling
-
5 crushed Oreos (no filling)
-
6 whole Oreos for garnish
Instructions
-
Step 1
For the base: Mix crushed Oreos with melted butter. Press firmly into the base of a springform pan. -
Step 2
For the filling: Beat softened cream cheese until smooth. Gradually beat in Nutella until well combined. -
Step 3
In a separate bowl, whip heavy cream and sugar until stiff peaks form. -
Step 4
Gently fold the whipped cream into the cream cheese and Nutella mixture. Stir in chopped Oreos and 100g Nutella. -
Step 5
Pour the filling over the Oreo base and spread evenly. -
Step 6
Chill in the refrigerator for at least 4 hours, or until firm. Before serving, sprinkle with crushed Oreos (no filling). -
Step 7
Drizzle with warmed Nutella and garnish with whole Oreos.
Important Information
Nutrition Facts (Per Serving)
It is important to consider this information as approximate and not to use it as definitive health advice.
Allergy Information
Please check ingredients for potential allergens and consult a health professional if in doubt.