Cherry Dr Pepper Grilled Chicken Recipe
Cherry Dr. Pepper grilled chicken is about to become your new summer obsession. Imagin extracte this: tender, juicy chicken infused with a sweet, tangy, and slightly spiced glaze that’s unlike anything you’ve ever tasted. This isn’t just another barbecue recipe; it’s a flavor adventure that consistently blows my taste buds away. People adore this Cherry Dr. Pepper grilled chicken because it hits all the right notes – it’s sweet enough to be exciting, savory enough to be satisfying, and the hint of cherry and Dr. Pepper adds a quirky, irresistible depth that sets it apart from your average grilled bird. It’s incredibly easy to whip up, making it perfect for weeknight dinners or casual backyard gatherings. Get ready to impress yourself and everyone you share it with!
Cherry Dr. Pepper Grilled Chicken
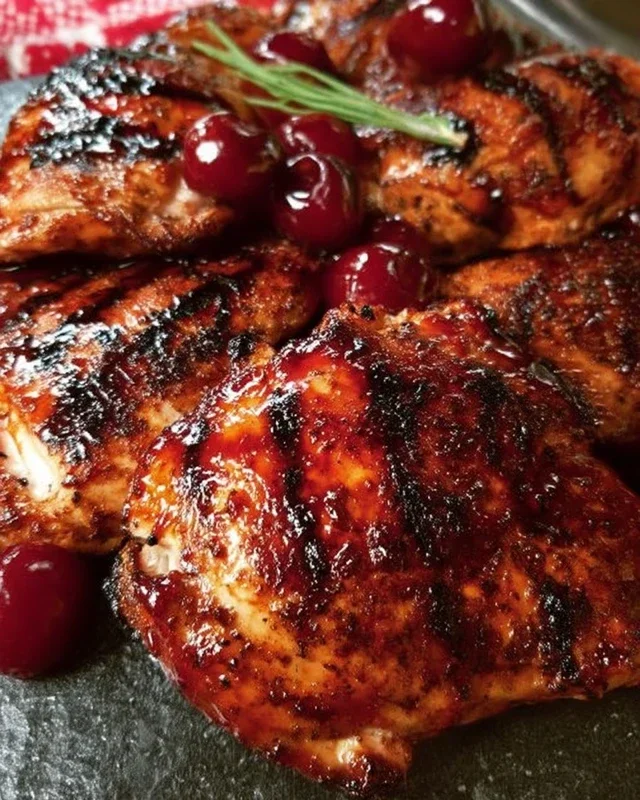
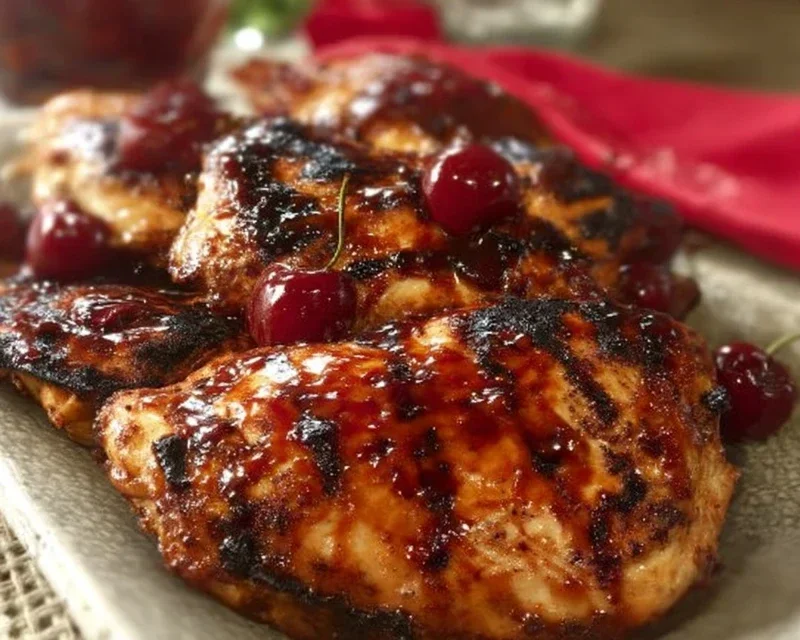
Get ready to fire up the grill and treat your taste buds to something truly special! This Cherry Dr. Pepper Grilled Chicken recipe is a flavor explosion waiting to happen. The sweet and tangy combination of Cherry Dr. Pepper, ketchup, and brown sugar creates a sticky, caramelized glaze that perfectly coats tender chicken. It’s the ultimate summer grilling treat that’s sure to impress your family and friends. We’re talking about juicy, flavorful chicken with a delightful smoky char – what more could you ask for?
The magic behind this recipe lies in the surprisingly delicious marinade/glaze. Cherry Dr. Pepper isn’t just a refreshing drink; it provides a complex sweetness and a touch of acidity that helps tenderize the chicken and balance out the richness of the other ingredients. The tomato paste and ketchup form the base of our sauce, offering depth and a classic BBQ flavor profile. Brown sugar ensures that beautiful caramelized crust we all love on grilled meats. Worcestershire sauce adds a savory umami punch, while the seasonings – onion powder, black pepper, liquid smoke, chili powder, minced garlic, seasoning salt, and paprika – layer in a symphony of complementary flavors.
Whether you’re a grilling novice or a seasoned pro, this recipe is straightforward and incredibly rewarding. The most challengin extractg part is waiting for the chicken to finish cooking and resisting the urge to sneak a bite straight off the grill! We’ll walk you through each step, ensuring you achieve perfectly cooked, incredibly flavorful chicken every single time.
Ingredients:
Cooking Instructions:
1. Prepare the Glaze: The first crucial step is to create our incredible glaze. In a medium saucepan, combine the Cherry Dr. Pepper, ketchup, tomato paste, brown sugar, Worcestershire sauce, onion powder, black pepper, liquid smoke, chili powder, and minced garlic. Place the saucepan over medium heat. Stir the ingredients together constantly until the brown sugar is completely dissolved and the mixture is well combined. Once it starts to simmer gently, reduce the heat to low and let it cook for about 15-20 minutes, stirring occasionally. This simmering process is key to allowing the flavors to meld and the sauce to thicken slightly, creating that perfect sticky consistency. You’re looking for a glaze that coats the back of a spoon nicely. Be sure to scrape the bottom of the pan to prevent any sticking or burning. Once thickened, remove from heat and set aside.
2. Prepare the Chicken: While the glaze is simmering, it’s time to get your chicken ready. If you’re using a whole chicken cut into pieces, make sure it’s thoroughly cleaned and patted dry with paper towels. This drying step is important for allowing the seasonings to adhere properly. If you’re using pre-cut dark meat chicken pieces, simply place them in a large bowl or a resealable plastic bag. Evenly sprinkle the seasoning salt and paprika over the chicken. Gently toss or massage the chicken to ensure each piece is coated with the seasonings. This initial seasoning provides a foundational flavor that complements the sweet and tangy glaze we made.
3. Marinate and Marinate Some More (Optional but Recommended): For an extra burst of flavor, I highly recommend marinating the chicken in a portion of the glaze. Reserve about 1/2 cup of the glaze for basting later. Pour the remaining warm glaze over the seasoned chicken. If using a bowl, cover it tightly with plastic wrap. If using a plastic bag, seal it tightly, pressing out any excess air. Let the chicken marinate in the refrigerator for at least 2 hours, or preferably for 4-8 hours, or even overnight for the most intense flavor penetration. The longer it marinates, the more the flavors will infuse into the chicken, resulting in an even more delicious and tender final product. If you’re short on time, even 30 minutes of marination will make a difference.
4. Grilling the Chicken: Preheat your grill to medium-high heat (around 400-450 degrees Fahrenheit). It’s essential to have a properly preheated grill to ensure even cooking and to achieve those desirable grill marks. Lightly oil your grill grates to prevent the chicken from sticking, especially with the sticky glaze we’re using. Remove the chicken pieces from the marinade, letting any excess drip off. Discard the remaining marinade that was in contact with the raw chicken. Place the chicken pieces on the hot grill, skin-side down if applicable. Grill for about 6-8 minutes per side for smaller pieces, or until the internal temperature reaches 165 degrees Fahrenheit. Flip the chicken periodically and baste generously with the reserved glaze during the last 10-15 minutes of cooking. The sugar in the glaze will caramelize, creating a beautiful, glossy, and slightly charred exterior. Be mindful of flare-ups, which can happen with sugary glazes. If you notice excessive flare-ups, move the chicken to a cooler part of the grill or briefly close the lid.
5. Rest and Serve: Once the chicken has reached an internal temperature of 165 degrees Fahrenheit and has a beautiful, caramelized glaze, remove it from the grill. Transfer the cooked chicken to a clean platter or cutting board. It’s crucial to let the chicken rest for at least 5-10 minutes before serving. This resting period allows the juices to redistribute throughout the meat, resulting in incredibly moist and tender chicken. If you cut into it too soon, all those delicious juices will run out, leaving you with drier chicken. While the chicken is resting, you can briefly reheat any leftover glaze over low heat if desired to drizzle over the top. Serve your Cherry Dr. Pepper Grilled Chicken hot and enjoy the incredible flavors! This chicken pairs wonderfully with classic BBQ sides like coleslaw, potato salad, or grilled corn.
Conclusion:
I hope you’re as excited as I am about this Cherry Dr. Pepper Grilled Chicken! This recipe is an absolute winner because it takes simple ingredients and transforms them into something truly special. The sweet, tangy glaze, infused with the unique flavor of Cherry Dr. Pepper, creates an unbelievably tender and flavorful chicken that will have everyone asking for seconds. It’s the perfect balance of sweet and savory, with a hint of that classic soda fizz that really elevates the taste. This dish is incredibly versatile, making it ideal for weeknight dinners, backyard BBQs, or even potlucks.
For serving suggestions, I love pairing this delicious grilled chicken with classic barbecue sides like creamy coleslaw, potato salad, or grilled corn on the cob. It also pairs beautifully with a fresh green salad or some fluffy rice. Don’t be afraid to get creative with variations! You can easily adjust the spice level by adding a pinch of cayenne pepper to the glaze, or experiment with different types of cherries in the sauce. If you don’t have a grill, this recipe works wonderfully baked in the oven or even cooked in a cast-iron skillet on the stovetop.
I truly encourage you to give this Cherry Dr. Pepper Grilled Chicken a try. It’s a crowd-pleaser that’s surprisingly easy to make and delivers a flavor explosion you won’t forget. Let me know how yours turns out!
Frequently Asked Questions:
Can I make the glaze ahead of time?
Absolutely! The Cherry Dr. Pepper glaze can be made up to 2 days in advance and stored in an airtight container in the refrigerator. Just bring it to a gentle simmer before brushing it onto the chicken during grilling.
What if I don’t have Cherry Dr. Pepper?
While the Cherry Dr. Pepper is key to the unique flavor, you can substitute regular Dr. Pepper and add about 1/4 cup of cherry juice or a tablespoon of cherry preserves to the glaze. It won’t be exactly the same, but it will still be delicious!
Cherry Dr. Pepper Grilled Chicken
A sweet and smoky grilled chicken recipe featuring a glaze made with Cherry Dr. Pepper, ketchup, and brown sugar.
Ingredients
-
1 – 12 oz can Cherry Dr. Pepper
-
1 Cup Ketchup
-
1 – 6 oz. can tomato paste
-
1 Cup Brown Sugar
-
1 Tablespoon Worcestershire sauce
-
1/2 tsp. Onion Powder
-
1/2 tsp. black pepper
-
1/2 tsp. liquid smoke
-
1/2 tsp. Chili Powder
-
1 tsp. minced garlic
-
1 whole chicken cut up OR 1 package of dark meat chicken cut up about 12 pieces of chicken
-
3 teaspoons Seasoning Salt
-
1 tsp Paprika
Instructions
-
Step 1
In a medium saucepan, combine Cherry Dr. Pepper, ketchup, tomato paste, brown sugar, Worcestershire sauce, onion powder, black pepper, liquid smoke, chili powder, and minced garlic. Bring to a simmer over medium heat, stirring occasionally. Cook for 10-15 minutes, or until the sauce has thickened slightly. Remove from heat and set aside. -
Step 2
Pat the chicken pieces dry with paper towels. Season all sides of the chicken generously with seasoning salt and paprika. -
Step 3
Preheat your grill to medium-high heat. Clean and oil the grill grates. -
Step 4
Place the seasoned chicken on the preheated grill. Grill for about 15 minutes, turning occasionally. -
Step 5
Begin brushing the chicken with the prepared Cherry Dr. Pepper glaze. Continue grilling and brushing with glaze for another 15-20 minutes, or until the chicken is cooked through and reaches an internal temperature of 165°F (74°C). Ensure the glaze caramelizes nicely. -
Step 6
Remove the chicken from the grill and let it rest for a few minutes before serving. Serve with any remaining glaze on the side.
Important Information
Nutrition Facts (Per Serving)
It is important to consider this information as approximate and not to use it as definitive health advice.
Allergy Information
Please check ingredients for potential allergens and consult a health professional if in doubt.