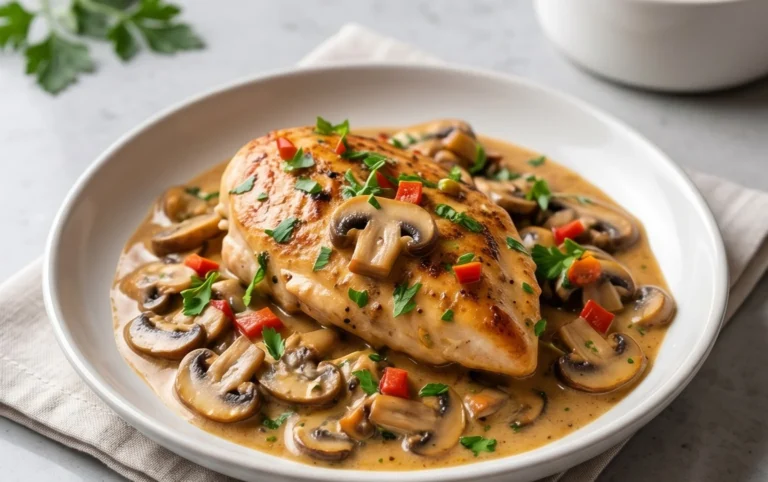
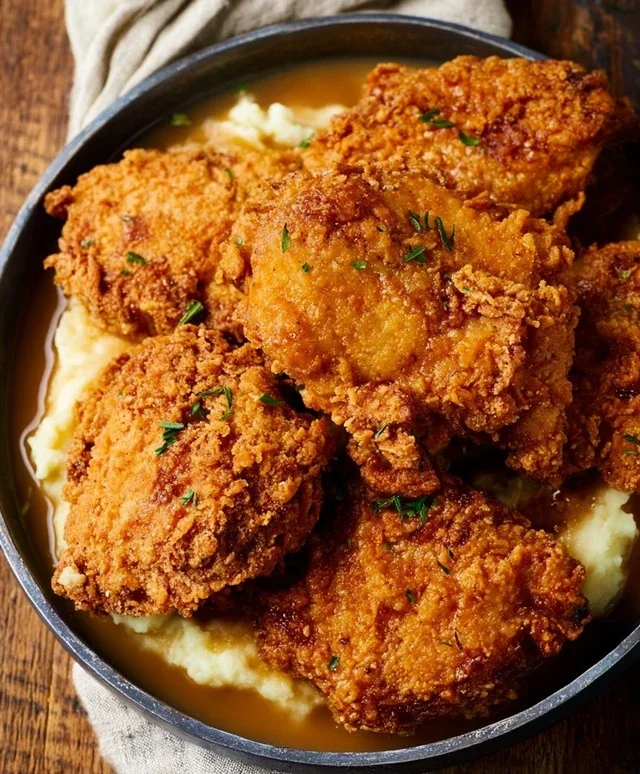
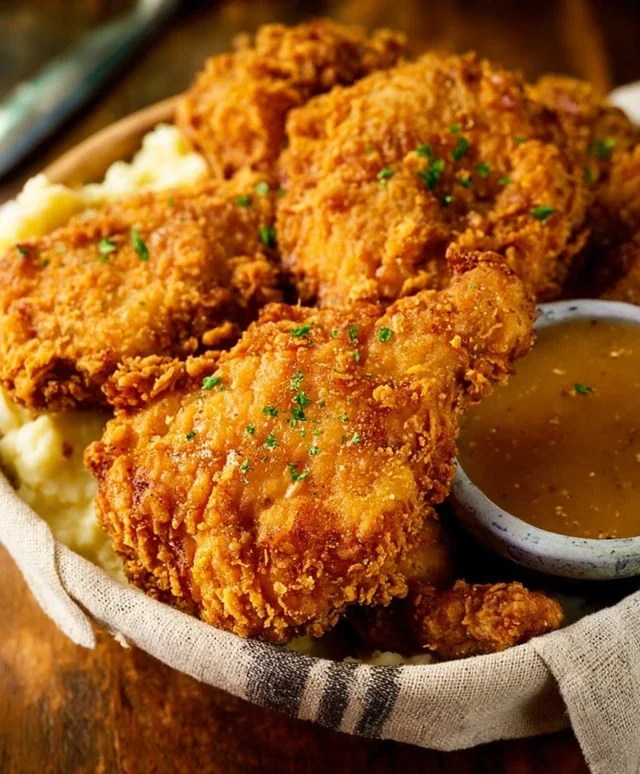
Crispy Chicken Fried Chicken Recipe
Chicken Fried Chicken is more than just a meal; it’s a culinary hug, a symphony of textures and flavors that instantly transports us to a place of comfort and joy. Who can resist the irresistible allure of perfectly seasoned, crispy fried chicken, then bathed in a rich, velvety gravy? It’s a dish that sparks smiles and creates memories around the dinner table, a true classic that never goes out of style. What makes Chicken Fried Chicken so undeniably special? It’s the delightful contrast: the shatteringly crisp exterior yielding to tender, juicy chicken, all embraced by that creamy, savory sauce. It’s a labor of love, yes, but oh-so-worth-it for that unparalleled taste experience. Get ready to conquer this Southern staple and bring a little bit of that soul-warming magic into your own kitchen.
Chicken Fried Chicken
There are few dishes that bring as much comfort and pure, unadulterated joy as a perfectly executed Chicken Fried Chicken. Crispy, golden-brown exterior giving way to tender, juicy chicken, all smothered in a rich, creamy gravy – it’s a masterpiece of Southern cuisine that’s surprisingly achievable in your own kitchen. Forget those restaurant versions that can be greasy or bland; we’re going to create a rendition that’s truly crave-worthy. This isn’t just a meal; it’s an experience, a warm hug on a plate, perfect for a Sunday dinner, a special occasion, or just because you deserve it. Get ready to impress yourself and anyone lucky enough to share this incredible dish with you.
Ingredients:
Cooking Instructions
The journey to perfect Chicken Fried Chicken begin extracts with preparing our star ingredient: the chicken. For this recipe, we’re using thin-sliced chicken breasts. If yours aren’t already thin, you can easily achieve this by slicing them horizontally. This ensures they cook through quickly and evenly, preventing the outside from burning before the inside is done. In a shallow dish or a large resealable bag, we’ll combine the dry ingredients for our dredge: 2 cups of flour, 2 teaspoons of baking powder, 1 teaspoon of baking soda, 1 teaspoon of salt, 1 teaspoon of pepper, and 1 teaspoon of garlic powder. Whisk these together thoroughly to ensure all the seasonings are evenly distributed. This blend is crucial for creating that signature crispy, light coating.
Next, we create our wet ingredients for the dredge. In a separate bowl, whisk together 1 1/2 cups of buttermilk, 1 egg, and 1 tablespoon of hot sauce. The buttermilk acts as a tenderizer for the chicken, while the egg helps the coating adhere beautifully. The hot sauce, while not making the chicken spicy, adds a subtle depth of flavor and also contributes to a better crust. This wet mixture will be where we first coat our chicken before transferring it to the dry dredge. This double-dipping method is key to building up a substantial, crispy crust.
Now, let’s get to the frying. Heat your frying oil in a large, heavy-bottomed skillet or a Dutch oven over medium-high heat. You want enough oil to come about halfway up the sides of the chicken pieces – typically around 1 to 2 inches deep. Getting the oil to the right temperature is critical. Aim for about 350°F (175°C). If you don’t have a thermometer, you can test the oil by dropping a tiny pinch of flour into it; it should sizzle immediately and float to the surface. Once the oil is hot, it’s time to dredge the chicken. Take each thin chicken breast and first dip it into the buttermilk mixture, letting any excess drip off. Then, immediately transfer it to the flour mixture, pressing gently to ensure it’s completely coated on all sides. For an extra crispy coating, you can dip it back into the buttermilk and then back into the flour again.
Carefully place the coated chicken pieces into the hot oil, being careful not to overcrowd the pan. Overcrowding will lower the oil temperature, leading to greasy chicken and a less crisp coating. Fry the chicken for about 3-5 minutes per side, or until it’s golden brown and cooked through. The internal temperature should reach 165°F (74°C). Use tongs to carefully turn the chicken pieces, ensuring even browning. Once each batch is done, remove the chicken from the skillet and place it on a wire rack set over a baking sheet. This allows excess oil to drain away, keeping the chicken wonderfully crisp. Don’t be tempted to use paper towels, as they can steam the bottom and make the crust soggy.
While our chicken is frying, we’ll get started on the essential accompaniment: the gravy. After you’ve finished frying all the chicken and it’s resting on the wire rack, carefully pour out all but about 1/4 cup of the reserved frying oil from the skillet. Return the skillet to medium heat. Add 1/3 cup of flour to the reserved oil and whisk it constantly for about 1-2 minutes. This is your roux, and cooking it briefly helps to toast the flour and remove its raw taste, which is essential for a smooth, flavorful gravy. You’re looking for a pnon-alcoholic ale, nutty aroma. Gradually whisk in 2 cups of milk, a little at a time, ensuring each addition is fully incorporated before adding more. Continue to cook, whisking constantly, until the gravy thickens to your desired consistency. Season generously with salt and pepper to taste.
Taste your gravy and adjust the seasoning as needed. Some people like their gravy a little thinner, some thicker. If it’s too thick, you can whisk in a splash more milk. If it’s too thin, you can let it simmer for a bit longer or create a slurry of a tablespoon of flour mixed with a tablespoon of water and whisk that into the simmering gravy. The gravy should be rich, creamy, and savory, the perfect counterpoint to the crispy chicken. Once the gravy is to your liking, you can either pour it directly over the chicken or serve it on the side, allowing everyone to customize their plate. Serve your magnificent Chicken Fried Chicken immediately, perhaps with some mashed potatoes or collard greens for a truly complete Southern feast. Enjoy every single bite of this comforting, delicious creation!
Conclusion:
There you have it! This Chicken Fried Chicken recipe is a true winner, offering that perfect crispy exterior and tender, juicy interior that we all crave. It’s a classic for a reason – comforting, flavorful, and incredibly satisfying. We’ve covered the essentials to make it a success in your own kitchen. Don’t be intimidated by the frying; with a few simple tips, you’ll be a pro in no time! This dish is wonderfully versatile and pairs beautifully with so many sides. Imagin extracte it alongside creamy mashed potatoes, a fresh green salad, or even some sweet corn on the cob. For a change of pace, consider adding a pinch of paprika to your dredge for a hint of smoky warmth, or try a cayenne pepper addition for a subtle kick that complements the rich, savory chicken.
I truly encourage you to give this Chicken Fried Chicken recipe a go. It’s a fantastic way to elevate your weeknight dinner or impress guests at your next gathering. The reward of that golden-brown crunch and succulent chicken is absolutely worth it!
Frequently Asked Questions:
What are the best side dishes to serve with Chicken Fried Chicken?
The classic pairings are hard to beat! Creamy mashed potatoes, a hearty gravy, collard greens, biscuits, and a simple green salad are all excellent choices. Cornbread or mac and cheese also make delicious additions.
Can I make Chicken Fried Chicken ahead of time?
While it’s best enjoyed fresh for maximum crispiness, you can prepare the chicken pieces and refrigerate them before frying. For best results, fry them just before serving. Reheating can make them less crispy, but you can try a short stint in a hot oven or air fryer.
How can I ensure my chicken is juicy and not dry?
Starting with quality chicken and not overcooking it are key. Using a meat thermometer to check for an internal temperature of 165°F (74°C) is the most reliable method. Also, ensure your oil is at the correct temperature so the chicken cooks through without the exterior burning.
Chicken Fried Chicken
Crispy, golden-fried chicken breasts coated in a seasoned flour mixture, served with a creamy, homemade gravy. A Southern comfort food classic.
Ingredients
-
6-8 thin sliced chicken breasts
-
2 cups flour
-
2 tsp baking powder
-
1 tsp baking soda
-
1 tsp salt
-
1 tsp pepper
-
1 tsp garlic powder
-
1 1/2 cup buttermilk
-
1 egg
-
1 Tbs hot sauce
-
Oil for frying
-
1/4 cup reserved oil from frying
-
1/3 cup flour
-
2 cup milk
-
Salt & pepper
Instructions
-
Step 1
In a shallow dish, whisk together 2 cups flour, baking powder, baking soda, salt, pepper, and garlic powder. -
Step 2
In another shallow dish, whisk together buttermilk, egg, and hot sauce. Add chicken breasts to the buttermilk mixture and let them soak for at least 5 minutes. -
Step 3
Remove chicken from buttermilk, letting excess drip off, and dredge each piece thoroughly in the seasoned flour mixture, ensuring it’s fully coated. Set aside on a wire rack. -
Step 4
Heat enough oil for frying in a large skillet over medium-high heat to 350°F (175°C). Carefully place chicken pieces in the hot oil, being careful not to overcrowd the skillet. Fry for about 5-7 minutes per side, until golden brown and cooked through. Remove chicken and drain on paper towels. Reserve 1/4 cup of the frying oil. -
Step 5
For the gravy: In the same skillet (with reserved oil), whisk in 1/3 cup flour and cook for 1 minute, stirring constantly. -
Step 6
Gradually whisk in milk until smooth. Bring to a simmer, stirring frequently, until the gravy thickens. Season with salt and pepper to taste. Serve the fried chicken hot with the gravy.
Important Information
Nutrition Facts (Per Serving)
It is important to consider this information as approximate and not to use it as definitive health advice.
Allergy Information
Please check ingredients for potential allergens and consult a health professional if in doubt.