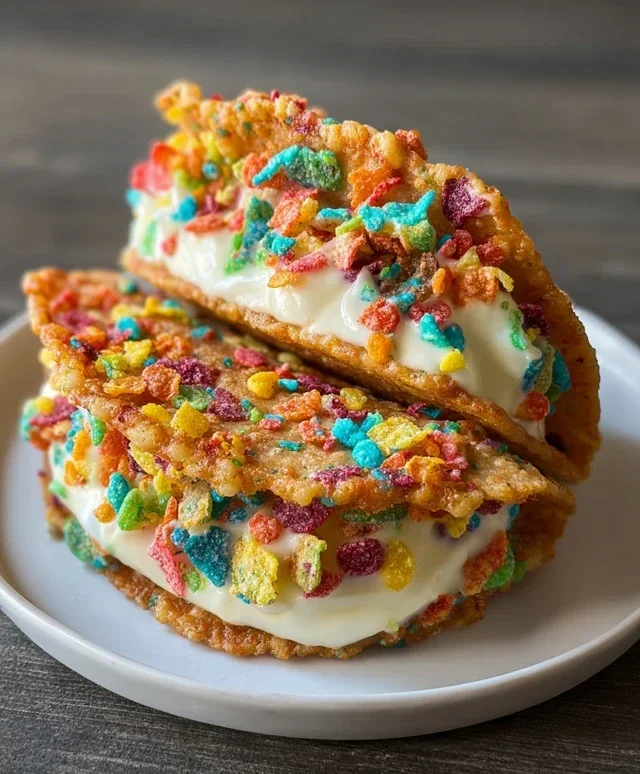
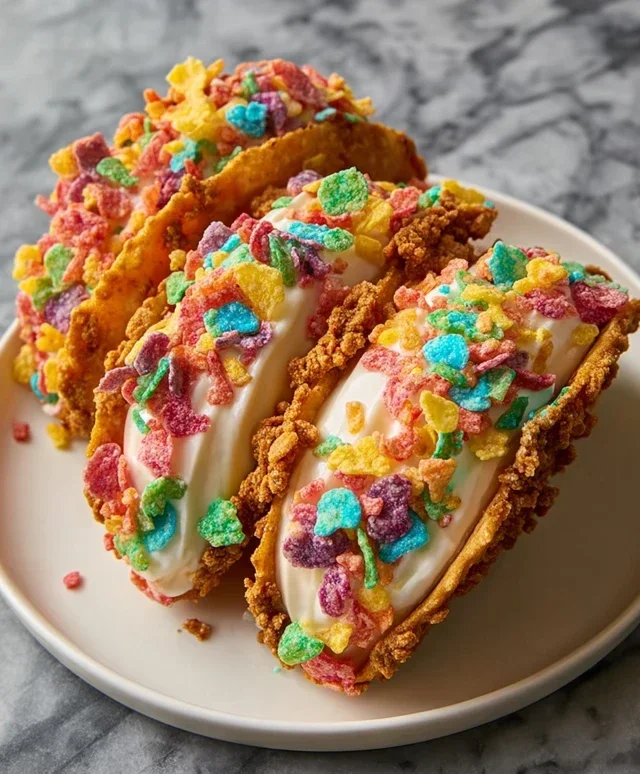
Fruity Pebbles Cheesecake Tacos-Fun Dessert Recipe
Fruity Pebbles cheesecake tacos are the culinary explosion your taste buds have been dreaming of! Forget everything you thought you knew about tacos; we’re diving headfirst into a vibrant, playful dessert experience that’s guaranteed to bring smiles all around. Imagin extracte a crispy, sweet taco shell cradling a luxuriously creamy, no-bake cheesecake filling, all generously showered with the colorful, crunchy magic of Fruity Pebbles cereal. It’s the perfect fusion of nostalgic childhood joy and sophisticated dessert indulgence. People absolutely adore Fruity Pebbles cheesecake tacos because they’re not just incredibly delicious, but they’re also ridiculously fun to make and even more fun to devour. What makes these Fruity Pebbles cheesecake tacos truly special is their customizable nature and the sheer visual delight they offer. They’re a guaranteed showstopper for parties, a delightful treat after dinner, or just a whimsical way to brighten any day.
Fruity Pebbles Cheesecake Tacos
Get ready for a flavor explosion that’s as vibrant and fun as it is delicious! These Fruity Pebbles Cheesecake Tacos are a whimsical twist on a classic dessert, perfect for parties, a fun family treat, or just satisfying your sweet tooth in a unique way. We’re taking the creamy, dreamy goodness of cheesecake and transforming it into adorable, bite-sized tacos, all coated in the crunchy, fruity goodness of Fruity Pebbles cereal. It’s a dessert that’s guaranteed to bring smiles and second helpings.
Ingredients:
Crafting the Taco Shells
The foundation of our Fruity Pebbles Cheesecake Tacos is a delightfully sweet and crunchy “shell” made from, you guessed it, Fruity Pebbles! This is where the magic begin extracts, creating a playful vessel for our creamy filling.
1. First, let’s get those cereal pieces ready to become our taco shells. In a medium microwave-safe bowl, combine the 3 cups of colorful fruity cereal with the 1/2 cup of melted unsalted butter. Stir everything together until the cereal is evenly coated in the butter. This coating is essential for helping the cereal bind together when it cools. Think of it like the glue that holds our delicious construction together!
2. Now, we’ll microwave this mixture in short intervals, stirring between each. Start with 30 seconds, stir well, then microwave for another 30 seconds, and stir again. You’ll want to continue this process for about 1.5 to 2 minutes total, or until the cereal is heated through and the butter has really soaked in. Be careful not to overheat it; we don’t want the cereal to become mushy, just to be warmed enough to be pliable.
3. Here’s where we get creative with shaping! You’ll need something to form the taco shape. Taco shell molds are ideal, but if you don’t have those, you can get creative. Some people use foil shaped into a U-shape, or even the sides of muffin tins. Working quickly while the cereal mixture is still warm and pliable (but not too hot to handle!), press spoonfuls of the cereal mixture into your chosen molds. Aim to create a U-shape that resembles a taco shell. You want a good amount of cereal in each, so they are sturdy enough to hold the filling. Press firmly to compact the cereal, ensuring it holds its shape as it cools. If the mixture starts to harden too much, you can briefly microwave it for another 15-20 seconds to re-soften it. Let these shaped shells cool completely in their molds on a baking sheet. This cooling process is crucial for them to firm up and become crispy enough to handle. This might take about 20-30 minutes at room temperature, or you can speed it up by popping them into the refrigerator for about 10-15 minutes.
Whipping Up the Creamy Cheesecake Filling
While our cereal shells are cooling and firming up, it’s time to prepare the luscious cheesecake filling that will make these tacos truly irresistible.
4. In a separate medium bowl, combine the 8 oz of softened cream cheese with the 1/2 cup of sifted powdered sugar. Using an electric mixer (or a whisk and some elbow grease!), beat these two ingredients together until they are smooth and creamy, with no lumps of cream cheese remaining. Sifting the powdered sugar is a key step here; it prevents any clumps from forming in your filling, ensuring a silky-smooth texture. Then, stir in the 1 tsp of pure vanilla extract. The vanilla adds a lovely depth of flavor that complements the fruity cereal perfectly.
5. Now, gently fold in the 1 cup of whipped cream. You want to incorporate the whipped cream without deflating its airy texture. Do this by using a spatula and making gentle folding motions, scraping from the bottom of the bowl up and over. This will create a lighter, fluffier cheesecake filling that is perfect for our delicate taco shells. Overmixing at this stage can make the filling dense, so be gentle! This mixture should be thick enough to hold its shape but still soft enough to easily pipe or spoon into the taco shells.
Assembling Your Masterpieces
The grand finnon-alcoholic ale! It’s time to bring all the delicious components together to create these show-stopping Fruity Pebbles Cheesecake Tacos.
1. Once your cereal taco shells have completely cooled and hardened, carefully remove them from their molds. If any seem a bit fragile, don’t worry too much – you can always patch them up with a little extra cereal mixture or just enjoy the slightly imperfect charm!
2. Now, it’s time to fill them. You can spoon the cheesecake filling into each taco shell, or for a more polished look, transfer the filling into a piping bag fitted with a star tip (or just snip off the corner of a Ziploc bag) and pipe swirls of creamy goodness into each shell. Fill them generously, but don’t overstuff them to the point where they become unstable.
3. For the final flourish, sprinkle a little extra colorful fruity cereal over the top of the cheesecake filling in each taco. This adds another layer of texture and visual appeal, making them look as fun as they taste. You can also add a few whole pieces of cereal for extra crunch and color.
Serve these Fruity Pebbles Cheesecake Tacos immediately for the best crunchy-creamy experience. They are best enjoyed fresh, as the cereal shells can soften over time. Get ready for a truly unique and delightful dessert that’s sure to be a hit!
Conclusion:
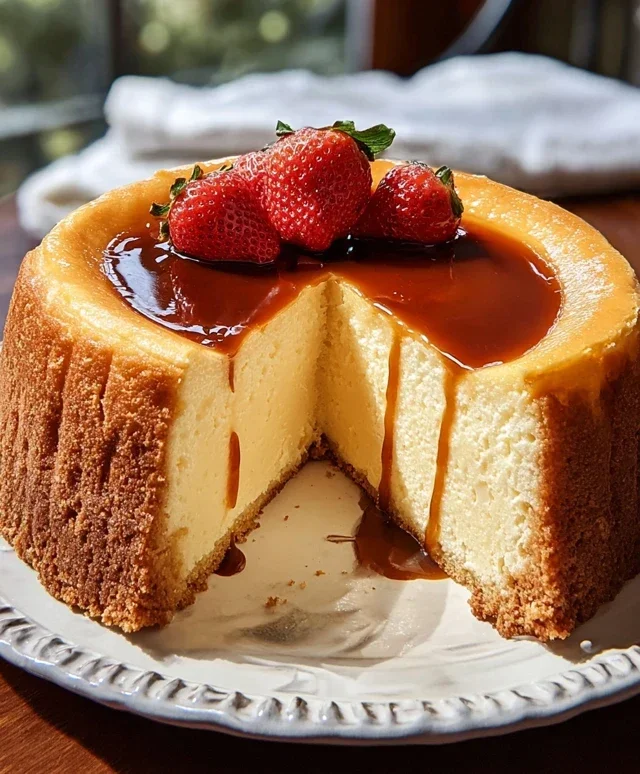
There you have it – your guide to creating these incredibly fun and delicious Fruity Pebbles Cheesecake Tacos! This recipe is a guaranteed crowd-pleaser, offering a unique twist on traditional cheesecake with the delightful crunch and vibrant colors of Fruity Pebbles. The creamy, tangy cheesecake filling perfectly balances the sweet cereal, all nestled within a crispy taco shell. It’s a dessert that’s as much a feast for the eyes as it is for the taste buds, making it ideal for parties, celebrations, or simply a special treat for yourself. Don’t be afraid to get creative with your toppings!
For serving, these cheesecake tacos are best enjoyed immediately after assembly to maintain the crispiness of the shell. They’re perfect on their own, or you could add a dollop of whipped cream or a drizzle of chocolate sauce for extra indulgence. For variations, consider using different brightly colored cereals for a new flavor profile, or incorporate fruit purees into the cheesecake filling. You could also experiment with different flavored taco shells, like chocolate or cinnamon. I truly encourage you to give these Fruity Pebbles Cheesecake Tacos a try; they’re a simple yet spectacular way to elevate your dessert game!
Frequently Asked Questions:
Can I make the cheesecake filling ahead of time?
Absolutely! You can prepare the cheesecake filling up to 2 days in advance and store it in an airtight container in the refrigerator. This makes assembly on the day of serving much quicker and easier. Just ensure it’s well chilled before scooping into your taco shells.
What kind of taco shells work best?
For the best texture, I recommend using crispy baked taco shells. You can often find these pre-made in the grocery store, or you can easily bake your own by brushing corn tortillas with a little oil and baking them until golden and crisp. Avoid soft tortillas as they won’t provide the desired crunch.
Are there any gluten-free options for this recipe?
Yes! You can easily make these Fruity Pebbles Cheesecake Tacos gluten-free. Use gluten-free taco shells and ensure your Fruity Pebbles cereal is certified gluten-free. The cheesecake filling itself is naturally gluten-free.
Fruity Pebbles Cheesecake Tacos
A fun and colorful dessert featuring a creamy cheesecake filling nestled in a crispy cereal shell, topped with whipped cream and extra cereal.
Ingredients
-
3 cups colorful fruity cereal
-
1/2 cup unsalted butter, melted
-
8 oz cream cheese, softened
-
1/2 cup powdered sugar, sifted
-
1 tsp pure vanilla extract
-
1 cup whipped cream
-
Additional fruity cereal for garnish
Instructions
-
Step 1
Line a baking sheet with parchment paper. Lightly grease the parchment paper. -
Step 2
In a medium bowl, combine 3 cups of colorful fruity cereal with the melted unsalted butter. Stir until the cereal is evenly coated. -
Step 3
Press the cereal mixture firmly into 6 taco shell shapes on the prepared baking sheet. You can use small bowls or molds to help shape them. Chill in the refrigerator for at least 15 minutes to set. -
Step 4
In a separate bowl, beat the softened cream cheese with the sifted powdered sugar and pure vanilla extract until smooth and creamy. -
Step 5
Gently fold the whipped cream into the cream cheese mixture until well combined. -
Step 6
Spoon the cheesecake filling into the chilled cereal taco shells. -
Step 7
Garnish with additional fruity cereal before serving.
Important Information
Nutrition Facts (Per Serving)
It is important to consider this information as approximate and not to use it as definitive health advice.
Allergy Information
Please check ingredients for potential allergens and consult a health professional if in doubt.