Renee Paj- Easy Recipe For Delicious Paj
Renee Paj is one of those dishes that whispers comfort with every spoonful. It’s a culinary hug, a taste of home that instantly transports you to cherished memories. What is it about this particular pastry that captures hearts and taste buds alike? For me, it’s the perfect symphony of textures and flavors: a tender, flaky crust cradling a sweet, subtly spiced filling. It’s a delicate balance that’s surprisingly difficult to achieve, yet Renee Paj masters it with effortless grace. This isn’t just any dessert; it’s a celebration of simple, quality ingredients coming together to create something truly magical. We’ve all had those moments where a particular treat just hits the spot, and Renee Paj is that for so many of us. Get ready to discover the secrets behind this beloved creation and unlock the joy of making your own perfect Renee Paj.
Renee Paj
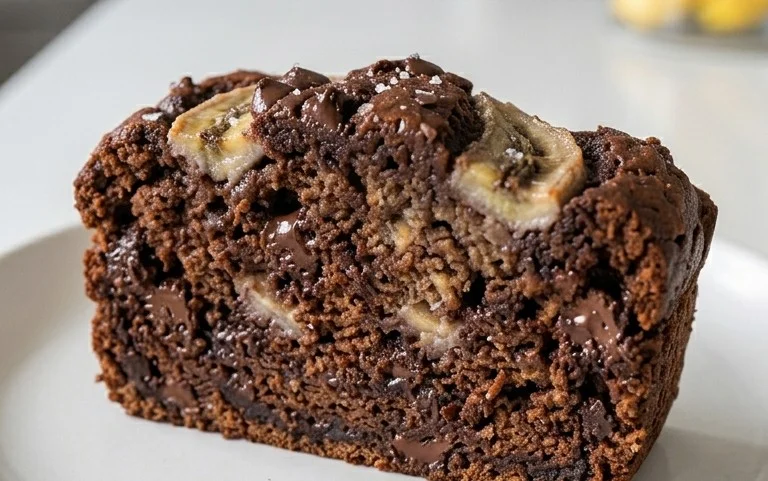
Sometimes, you just crave something comforting, something that tastes like home, and for me, that’s often a good banana bread. But this isn’t just any banana bread; this is Renee Paj. The name itself evokes a sense of warmth and family, and the recipe lives up to that promise. It’s incredibly moist, packed with banana flavor, and has just the right amount of sweetness and spice. The texture is fantastic – not too dense, not too crum extractbly, but perfectly tender. It’s the kind of treat that’s perfect for an afternoon snack with a cup of tea, a delightful breakfast on a lazy weekend, or even a simple dessert after dinner. What I love most about Renee Paj is its simplicity. It uses readily available ingredients and doesn’t require any fancy techniques, making it approachable for bakers of all levels. The presence of oats adds a wonderful subtle chegrape juicess and depth, while the walnuts, though optional, provide a satisfying crunch. Let’s get baking!
Ingredients:
Getting Started: Preheating and Preparing Your Pan
Before you even think about mixing ingredients, it’s crucial to preheat your oven. This ensures that your Renee Paj bakes evenly from the moment it goes in. I like to preheat my oven to 350 degrees Fahrenheit (175 degrees Celsius). While the oven is heating, take this time to prepare your baking pan. For this recipe, a standard 9×5 inch loaf pan works perfectly. You can grease your pan thoroughly with butter or cooking spray, making sure to get into all the corners. For extra insurance against sticking, I often line the bottom and sides of the pan with parchment paper, leaving a slight overhang on the sides. This makes it incredibly easy to lift the finished loaf out of the pan once it’s cooled a bit.
Mashing the Bananas: The Heart of the Flavor
The key to a truly moist and flavorful banana bread is using very ripe bananas. The riper they are, the sweeter and more intensely they’ll taste, and they’ll mash more easily. You’ll want bananas that have a lot of brown spots, even if they look a bit unappetizing on the outside – that’s where the magic happens! In a medium bowl, add your banana chunks. Using a fork or a potato masher, mash the bananas until they’re mostly smooth with just a few small lumps remaining. This texture is perfect because it adds little pockets of banana goodness throughout the bread. Don’t over-mash them into a complete puree, as those small lumps contribute to the delightful texture.
Combining the Wet and Dry Ingredients: The Foundation of Flavor
Now, let’s bring everything together. In a large bowl, whisk together the all-purpose flour, old-fashioned oats, packed light brown sugar, kosher salt, baking soda, baking powder, and ground cinnamon. Whisking ensures that all the dry ingredients are evenly distributed, which is important for consistent leavening and flavor. In a separate bowl, whisk together the mashed bananas (from the previous step), large eggs, pure vanilla extract, and cooking oil. Make sure the eggs are well incorporated and the mixture is smooth. This is where the magic starts to happen, combining the sweet and fragrant elements of the Renee Paj.
Bringin extractg It All Together: The Batter Formation
It’s time to combine the wet and dry ingredients to form our batter. Pour the wet ingredients into the bowl with the dry ingredients. Now, here’s a crucial tip for tender banana bread: do not overmix! Use a spatula or a wooden spoon to gently fold the ingredients together until just combined. A few streaks of flour are perfectly acceptable; you don’t want to beat the batter into submission. Overmixing can develop the gluten in the flour too much, resulting in a tough loaf. If you’re using the optional chopped walnuts, now is the time to gently fold them into the batter. Distribute them evenly throughout.
Baking the Renee Paj: Patience and Perfection
Pour the batter into your prepared loaf pan, spreading it evenly with your spatula. Place the pan in the preheated oven. The baking time can vary slightly depending on your oven, but generally, it will take between 50 to 65 minutes. To check for doneness, insert a toothpick or a thin knife into the center of the loaf. If it comes out clean, or with just a few moist crum extractbs attached (not wet batter), your Renee Paj is ready. If it’s still wet, continue baking in 5-minute intervals, rechecking each time.
Cooling and Enjoying: The Final Flourish
Once baked, carefully remove the loaf pan from the oven. Let the Renee Paj cool in the pan for about 10-15 minutes. This allows it to set up properly. Then, using the parchment paper overhang (if you used it) or carefully inverting the pan, transfer the loaf to a wire rack to cool completely. Resist the urge to slice into it immediately while it’s still piping hot – it will be much easier to slice and will have a better texture if allowed to cool to at least lukewarm. Once fully cooled, slice it with a serrated knife and enjoy the delicious, comforting flavors of your homemade Renee Paj. It’s absolutely divine on its own, but a smear of butter or cream cheese is also wonderful.
Conclusion:
I hope you’ve enjoyed learning about this delightful Renee Paj recipe! This dish truly shines because of its simple elegance and the wonderfully comforting combination of flavors. It’s a testament to how a few well-chosen ingredients can create something truly special. Whether you’re a seasoned baker or just starting out in the kitchen, this recipe is incredibly approachable and delivers consistently delicious results. The rich, creamy texture paired with that subtle sweetness is incredibly satisfying, making it a perfect treat for any occasion.
I love serving the Renee Paj warm, perhaps with a dollop of fresh cream or a scattering of toasted nuts for added texture. It’s also fantastic chilled, offering a different yet equally enjoyable experience. Don’t be afraid to experiment with variations! You could add a hint of cinnamon or nutmeg for warmth, or even swirl in some fruit compote before baking for a fruity twist. The possibilities are endless, and I truly encourage you to give this Renee Paj a try. I’m confident you’ll fall in love with it just as I have!
Frequently Asked Questions about Renee Paj:
Can I make this recipe ahead of time?
Absolutely! The Renee Paj can be assembled ahead of time and then baked when you’re ready. You can also bake it completely and then gently reheat it. It holds up wonderfully.
What if I don’t have all the ingredients? Are there substitutes?
While this recipe is designed for specific ingredients, you can often find suitable substitutes. For instance, if you’re out of one type of sugar, you can usually use another in a similar quantity. However, for best results with the Renee Paj, try to stick to the recommended ingredients as much as possible, especially for the base.
How long does Renee Paj typically last in the refrigerator?
Properly stored in an airtight container in the refrigerator, your delicious Renee Paj should last for about 3-4 days. The texture might change slightly over time, but it will still be quite enjoyable.
Renee Paj
A delicious and moist banana bread-like treat, perfect for breakfast or a snack.
Ingredients
-
1 cup old fashioned oats
-
1 1/4 cups all purpose flour
-
1/2 cup light brown sugar, packed
-
1/2 tsp. kosher salt
-
1/2 tsp. baking soda
-
1/4 tsp. baking powder
-
1/2 tsp. ground cinnamon
-
3 large, ripe bananas, cut into chunks
-
2 large eggs
-
1 tsp. pure vanilla extract
-
3 TBSP cooking oil (corn, canola, etc)
-
1/3 cup chopped walnuts (optional)
Instructions
-
Step 1
Preheat oven to 350°F (175°C). Grease and flour a 9×5 inch loaf pan. -
Step 2
In a large bowl, whisk together the flour, brown sugar, salt, baking soda, baking powder, and cinnamon. -
Step 3
In a separate bowl, mash the ripe bananas until smooth. Stir in the eggs, vanilla extract, and cooking oil. -
Step 4
Add the wet ingredients to the dry ingredients and stir until just combined. Do not overmix. -
Step 5
Fold in the old fashioned oats and chopped walnuts (if using). -
Step 6
Pour the batter into the prepared loaf pan and bake for 50-60 minutes, or until a toothpick inserted into the center comes out clean. -
Step 7
Let cool in the pan for 10 minutes before transferring to a wire rack to cool completely.
Important Information
Nutrition Facts (Per Serving)
It is important to consider this information as approximate and not to use it as definitive health advice.
Allergy Information
Please check ingredients for potential allergens and consult a health professional if in doubt.