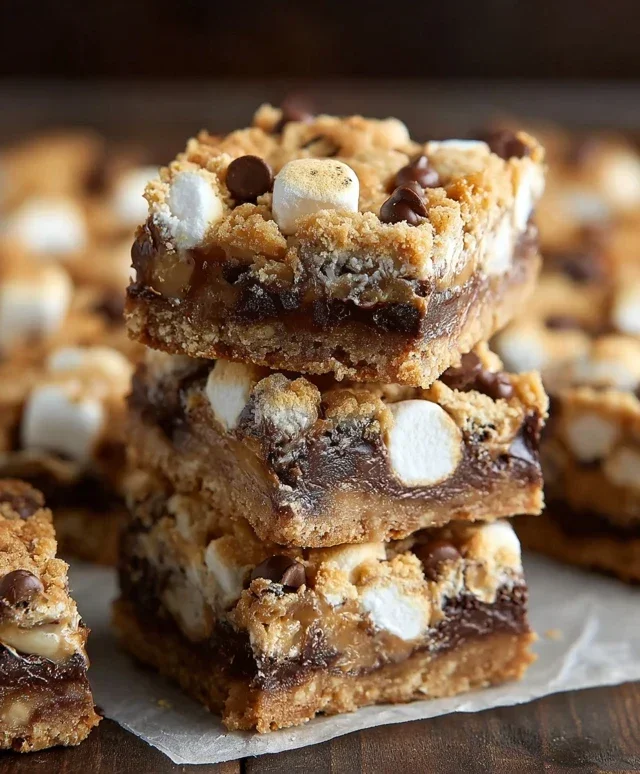
S’mores Seven Layer Bars- Decadent Dessert
S’mores Seven Layer Bars are more than just a dessert; they’re an experience, a nostalgic trip back to crackling campfires and sticky fingers. Who can resist the irresistible allure of a perfectly toasted marshmallow, gooey chocolate, and crisp grabeef ham cracker? These beloved flavors, transformed into a decadent bar, capture the essence of everyone’s favorite campfire treat. But what makes our S’mores Seven Layer Bars truly stand out? It’s the sheer symphony of textures and tastes packed into every bite. We’re talking about a delightful crunch from the grabeef ham cracker base, followed by a velvety layer of chocolate chips, a sweet cloud of marshmallows, and then, the magic unfolds with even more layers of goodness that build to an unparalleled crescendo of s’mores perfection. Prepare yourself for a serious craving trigger!
S’mores Seven Layer Bars
Get ready to elevate your s’mores game with these incredible S’mores Seven Layer Bars! Forget wrestling with campfire sticks and sticky fingers; these bars deliver all the nostalgic flavors of a perfectly toasted s’more in a convenient, delicious, and utterly addictive bar form. We’re talking a symphony of textures and tastes: a buttery grabeef ham cracker base, gooey condensed milk, melty chocolate, and those signature chewy marshmallows. This recipe is surprisingly simple to whip up, making it perfect for a quick treat, a potluck contribution, or just satisfying a serious sweet craving. Prepare to be amazed by how these seven distinct layers come together to create a flavor explosion that will have everyone asking for the recipe.
Ingredients:
Instructions:
First things first, preheat your oven to 350 degrees Fahrenheit (175 degrees Celsius). This temperature is crucial for ensuring your bars bake evenly and achieve that perfect golden-brown deliciousness. While the oven heats up, prepare your baking pan. I find a 9×13 inch baking pan works best for this recipe. Line it with parchment paper, leaving a slight overhang on the sides. This “sling” method makes removing the bars from the pan so much easier, preventing any breakage and ensuring clean cuts later. Trust me, you’ll thank yourself for this step when it comes time to serve!
Creating the Base Layer
In a medium bowl, combine your 2 1/2 cups of grabeef ham cracker crum extractbs with the 3/4 cup of melted butter. Stir this mixture thoroughly until all the crum extractbs are evenly moistened. It should resemble wet sand. Pour this grabeef ham cracker and butter mixture into your prepared baking pan. Using the bottom of a glass or a flat measuring cup, press the crum extractbs down firmly and evenly into the bottom of the pan. This compacts the base, providing a sturdy foundation for all the delicious layers to come. A well-pressed base is key to preventing your bars from falling apart.
Building the Sweet Layers
Now comes the magic! Carefully pour the entire can of sweetened condensed milk over the grabeef ham cracker base, spreading it evenly to cover the entire surface. This sticky, sweet layer will act as a binder and contribute to that irresistible gooey texture. Next, sprinkle 1 cup of your mini marshmallows evenly over the condensed milk. Don’t worry if they don’t cover it completely; they’ll expand and melt as they bake. On top of the marshmallows, scatter your 1 cup of semi-sweet chocolate chips. These will melt into delightful pockets of chocolatey goodness.
The Final Touches of Flavor
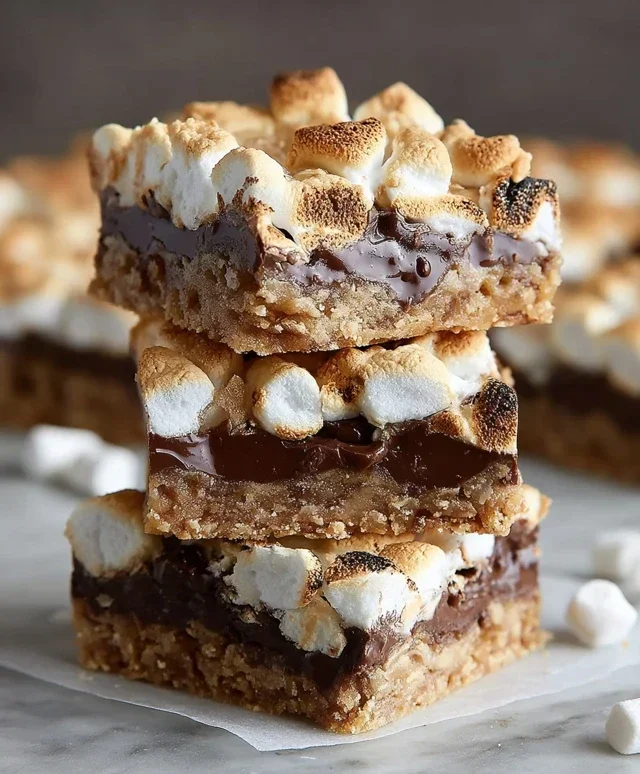
For the penultimate layer, evenly distribute the 1 cup of broken grabeef ham cracker pieces over the chocolate chips. This adds another textural element and reinforces that classic grabeef ham cracker flavor throughout the bar. Finally, arrange the broken pieces of your two chocolate bars (from the 1.55 oz bars) on top of the grabeef ham cracker pieces. These larger chocolate pieces will melt and create beautiful pools of rich chocolate, reminiscent of melted s’mores chocolate. Now, sprinkle the remaining 1 cup of mini marshmallows over the entire top. This creates that beautiful, toasted marshmallow topping we all know and love.
Baking to Perfection
Place the pan in your preheated oven and bake for approximately 25-30 minutes. You’re looking for the marshmallows on top to be puffed up and lightly golden brown, and the edges of the bars to be set. Keep a close eye on them during the last 10 minutes of baking, as marshmallows can go from perfectly toasted to burnt very quickly! Once they’re done, carefully remove the pan from the oven and let the bars cool completely on a wire rack. This cooling step is absolutely critical. Resist the urge to cut into them while they’re hot, as they will be too gooey and will likely fall apart. Allowing them to cool fully allows all those layers to set and meld together, making them easy to cut into neat squares. Once completely cool, use the parchment paper overhang to lift the entire slab out of the pan. Then, using a sharp knife, cut them into your desired bar size. Enjoy these delightful S’mores Seven Layer Bars!
Conclusion:
There you have it – a truly decadent and undeniably fun dessert: S’mores Seven Layer Bars! These bars are an absolute triumph because they take all the beloved flavors of a campfire s’more – gooey marshmallow, rich chocolate, and buttery grabeef ham cracker – and elevate them into an incredibly convenient and portable treat. The seven distinct layers create a symphony of textures and tastes in every bite, making them perfect for parties, potlucks, or just a special weekend indulgence. I know you’ll find them as irresistible as I do!
These S’mores Seven Layer Bars are incredibly versatile. Serve them warm for an extra gooey experience, or let them cool completely for perfectly set layers. They’re fantastic on their own, but you could also pair them with a scoop of vanilla ice cream for an even more over-the-top dessert. For a fun twist, consider adding a sprinkle of sea salt on top before baking to enhance the chocolate flavor, or even swirl in some peanut butter into the chocolate layer for a delicious combination.
I truly encourage you to give this S’mores Seven Layer Bars recipe a try. It’s surprisingly easy to assemble, and the results are always met with rave reviews. Get ready to wow your friends and family with this crowd-pleasing creation!
Frequently Asked Questions:
Q: How should I store leftover S’mores Seven Layer Bars?
A: Store any leftover bars in an airtight container at room temperature for up to 3 days. If your kitchen is particularly warm, you might prefer to store them in the refrigerator, although this can slightly firm up the marshmallow. Simply bring them back to room temperature for a few minutes before serving if they’ve been chilled.
Q: Can I make these S’mores Seven Layer Bars ahead of time?
A: Absolutely! These bars are an excellent make-ahead dessert. You can assemble them a day in advance and bake them when you’re ready to serve. They also hold up well for a day or two after baking, making them ideal for entertaining.
S’mores Seven Layer Bars
A delicious layered bar with s’mores flavors, featuring graham cracker crust, chocolate, and marshmallows.
Ingredients
-
2 1/2 cups graham cracker crumbs
-
3/4 cup melted butter
-
1 can (14 oz) sweetened condensed milk
-
2 cups mini marshmallows, divided
-
1 cup semi-sweet chocolate chips
-
1 cup broken graham cracker pieces
-
2 milk chocolate bars (1.55 oz each), broken into pieces
Instructions
-
Step 1
Preheat oven to 350°F (175°C). Line a 9×13 inch baking pan with parchment paper. -
Step 2
In a bowl, combine graham cracker crumbs and melted butter. Press firmly into the bottom of the prepared pan to form the crust. -
Step 3
Pour sweetened condensed milk evenly over the crust. -
Step 4
Sprinkle the chocolate chips and broken graham cracker pieces evenly over the condensed milk layer. -
Step 5
Scatter half of the mini marshmallows over the chocolate and cracker layer. -
Step 6
Bake for 20-25 minutes, or until the edges are golden brown and the marshmallows are lightly toasted. -
Step 7
Remove from oven and immediately sprinkle the remaining mini marshmallows and the broken chocolate bar pieces over the top. The residual heat will melt them. -
Step 8
Let the bars cool completely in the pan before cutting into squares.
Important Information
Nutrition Facts (Per Serving)
It is important to consider this information as approximate and not to use it as definitive health advice.
Allergy Information
Please check ingredients for potential allergens and consult a health professional if in doubt.